Reading Time: 8 minutes
Introduction
For an easy day walk in good weather along a well-signposted track in a National Park, a Parks supplied sketch or mud map is sufficient for navigation. A mobile phone with google maps and its GPS on can provide an exact location if required.
For longer trips the trip leader at least should have a topographic map and the ability to navigate using map and compass.
For harder or extended trips including any off-track or winter alpine trips, several group members should be well skilled in bush navigation using a map and compass.
For challenging trips to remote areas all group members should be capable bush navigators.
Navigation is learnt through much practice and experience in a wide range of terrain and weather conditions.
Skilled navigation requires observation and concentration, an awareness of terrain, walking speed and the ability to recognise features both on the map and on the ground as they are encountered, so that the group location can always be determined.
Group leaders are responsible for navigation, but it is not necessary or desirable for a leader to undertake all navigation tasks. Giving other group members responsibility to navigate over a section of the route provides them with the opportunity to develop and practice their skills. The leader should maintain a watchful eye to ensure the correct route is followed.
Handheld GPS
Handheld GPS are increasingly popular, especially models that include topographic maps. Some bushwalkers now prefer to navigate primarily with a GPS rather than map and compass.
However a paper topographic map remains most useful for route planning and when making route choices, due to its size. The small screens of a GPS or mobile phone are difficult to use for these purposes.
A good level of map and compass skills are very important for bushwalkers. A GPS or mobile phone can be lost, broken or have flat batteries. It is also much easier to learn to use a GPS with a good base of map and compass skills.
A handheld GPS should be regarded as another tool that complements rather than replaces skills, knowledge and ability in map reading, navigation and route finding.
This section focuses on bush navigation with map and compass.
The basics
To become proficient in bush navigation the following need to be understood:
- Types of topographic maps used for bushwalking
- Map scales
- Map legend and abbreviations generally used on topo maps
- Contour lines and and their interpretation including ridges, spurs, saddles, gullies and knolls
- Relationship between Grid North/True North and Magnetic North
- Setting (orienting) the map
- Using visible features
- Using a compass
- Bearing – a direction measured as an angle in degrees clockwise from North.
- Plotting a compass course from the map using a baseplate compass.
- Following a bearing using a baseplate compass
- Obtaining back bearings and using to plot position
- Six figure grid references.
These can be learnt by regularly walking or Rogaining with capable navigators.
There are also excellent online resources:
- Map Reading guide: How to Use Topographic Maps Edition 4 – Geoscience Australia
- Map Reading guide (PDF)
- Map reading resources, Ordnance Survey UK
- Navigation guide – learn the basics , Silva Compass
True North, Grid North, Magnetic North
True North (TN), Grid North (GN), Magnetic North (MN) are three different “norths” that can confuse beginning navigators. Even experienced bush navigators can muddle Magnetic North/True North and the conversion between them.
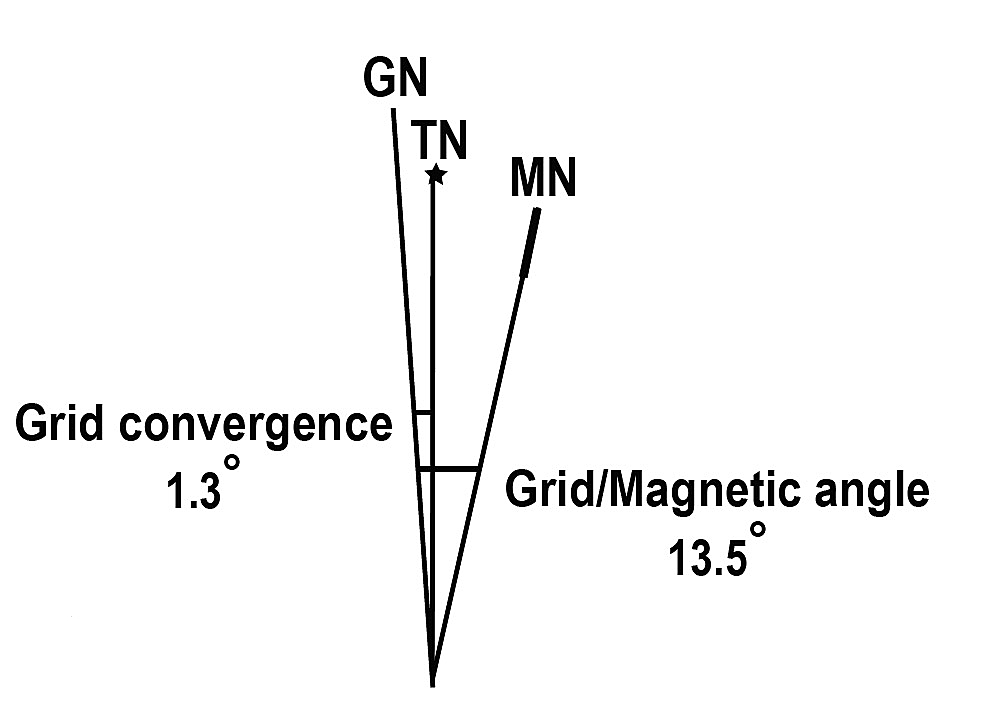
All topographic maps have a diagram similar to this one from an eastern Australia map.
- True North (TN) is the direction to the Earth’s North Pole.
- Grid North (GN) is the direction of the vertical grid lines (eastings) on a topographic map.
True North and Grid North are very similar, with a difference between them of less than 2 degrees. Such a small angle on its own would have no practical effect in bush navigation.
Magnetic North is the problem.
- Magnetic North (MN) is the direction to the earth’s North Magnetic Pole. This is not at the same place as the North Pole. As a result, Magnetic North can be be in a significantly different direction to True North.
- It ranges from about 5° west of True North in Western Australia to about 15° east of True North in eastern Australia. That difference matters.
- Grid North is important, because the North/South grid line is used as 0 degrees when measuring a compass bearing on the map.
- So the difference between Grid North and Magnetic North is important. This is known as the Grid/Magnetic angle.
In the example above, the Grid/Magnetic angle is 13.5 degrees. This is key information for the bush navigator whenever compass bearings are used.
A compass bearing is measured on the map from the N/S grid lines and is called the Grid Bearing.
To follow that bearing in the bush, it must first be converted to a Magnetic Bearing, since walking that bearing will rely on the compass needle (magnetic) pointing north (magnetic).
In the example above, typical for eastern Australia, 13 degrees needs to be SUBTRACTED from the GRID BEARING (the 0.5 deg is too small to matter) to obtain the MAGNETIC BEARING.
A mnemonic can be used to remember the rule, e.g.:
- “Grid is Greater” OR
- “MGA” (magnetic to grid add) and “GMS” (grid to magnetic subtract).
Note 1: Some references and the detailed text on topo maps, refer to the Magnetic North declination changing over time. While this is true the change is so tiny as to be of no practical significance for bush navigation, even if using an old topographic map. Bushwalkers can ignore this.
Note 2: Maps drawn for orienteering and some Rogaining events have magnetic north/south lines on the map, rather than grid lines to avoid the need to correct for grid/magnetic declination.
How to improve?
Extensive and varied practice in the field is essential to become proficient in bush navigation with map and compass. Making mistakes is an important part of learning to navigate well. To improve navigation:
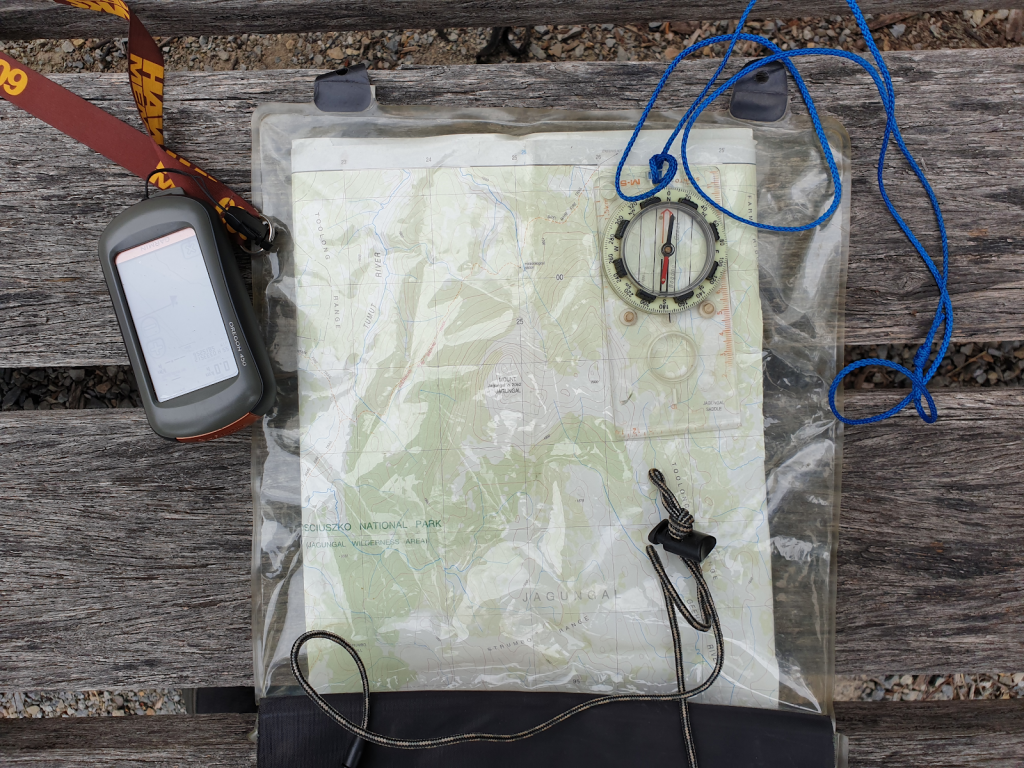
- Carry a topographic map and bushwalking (baseplate) compass on every trip
- Use a good quality map case, so the map is accessible
- Refer to the map regularly, about every 10 to 15 minutes and at key features:
- Orient the map
- Relate the map to features around and confirm location
- Walk with a capable navigator to discuss the finer points of navigation and the route ahead
- Navigate in more difficult conditions, including off-track, scrub, fog, rain, night; circumstances where skilled compass use is required as well as sound map reading
- Participate in some Rogaining events
Navigation in easy conditions
In open country or when walking on well mapped tracks in clear weather, navigation is generally done by direct map reading; identifying landmarks progressively while monitoring walking speed. A good navigator will refer to the compass only occasionally to confirm direction under such conditions.
Compass bearings are rarely needed, but the compass is useful to orientate the map correctly. This is important to ensure the map is correctly oriented with the surroundings (e.g. magnetic north on the map is the same direction as magnetic north on the compass).
A navigator must be able to form from the map a mental picture of the country before it is traversed. The terrain should then unfold more or less as has been visualised.
The navigator must therefore know how natural features appear on the map as contour lines including knolls, saddles, implied knolls or necks, gullies, cliffs, plateaux, ridges, spurs, stepped spurs, dividing spurs and creek junctions.
It is best to keep the map handy in a map case and check progress and refresh memory of the route ahead every 10 or 15 minutes and at key features and track junctions. It is important that any errors are identified and corrected early.
If a change of direction is intended at a particular point note where the feature is located.
For example a track junction may be in a deep saddle or on a slope facing gently down in a particular direction. If the first track junction encountered does not match the expected features then the track junction is probably not the correct one so the map should be checked closely.
While the form of the country as shown by contour lines is usually very accurate, tracks can be incorrect on any map.
Some tracks may not be on the map, either ignored by the map maker as being minor, or created since it was drawn. Vehicle tracks may be created during forest management activities including logging and fire management. Animal tracks (pads) that resemble walking tracks can be created by feral animals such as horses. Some marked tracks may have become overgrown since the map was produced.
In hilly country always note from the map whether the route is ascending or descending. When descending a spur or following a creek upstream take care to observe all junctions. To assist in identifying the location of a branch spur, estimate the amount of height gained or lost. Some navigators use an altimeter for this purpose.
When selecting an off-track route it is much easier to navigate up a spur or to follow a creek downstream (vegetation permitting). This is because side spurs converge going up a spur and side gullies converge going down a gully or creek so there is no confusion at junctions.
On the the other hand when descending a spur it is easy to divert onto a side spur so great care is needed – watch the compass and read the terrain very carefully.
Should the country traversed not match the map stop and carefully check the map and the route taken. Look at the terrain and surrounding features and match these back to the map. Consider whether walking speed has been misjudged or locations where it is possible the group has diverted from the intended route. A GPS will assist – use the location on the GPS map screen to match with a location on the paper map.
Develop the habit of looking back and memorising landmarks as seen from the opposite direction. For example, when ascending a peak and intending to return by the same route take particular note of any critical points where it would be possible to divert on the descent, which typically will be later in the day when tiredness and limited daylight may be factors. Even if not intending to retrace steps, this may be forced by a variety of circumstances such as bad weather, shortage of time or an injury.
Care with the compass
There are some precautions to take with a compass:
- Do not to store compasses together in a steel cabinet or drawer, or near a magnet. Over time the poles may reverse and the red end of the needle will point South.
- Do not use a compass near iron or steel objects (including a vehicle, wire fences) or power lines.
- In some locations the local geology (rock strata) may affect the compass. If the compass bearing alters significantly when it is held near the ground there may be a local magnetic anomaly. Guide books will usually indicate where this is a local problem. It is not common.
- Compasses manufactured for use in the northern hemisphere will not operate satisfactorily in the southern hemisphere and vice versa. The needle will not sit level and tends to jam. This is because the needle is weighted for magnetic dip, which is different in the two hemispheres. Some top of the range compasses have built in adjustment for this.
- Liquid-filled compasses may develop a bubble over time. The bubble will change in size with changes in altitude and temperature, but it does not affect the use of the compass unless it becomes quite large. The needle case can generally be replaced.